by Shoaib Rehman | Jul 8, 2015 | Magento, Web development

Magento 2.0
Magento is one of the best and widely used ecommerce platforms and according to a survey, businesses using Magento had more than £520b worth transaction in the year 2014. In the past few months, Magento experienced hundreds of hacking attempts and some of the web stores were compromised. Considering the severity of this issue Magento released it’s May patched for Magento EE and Magento CE version which helped retailers to secure their store and save the confidential information leakage.
Yesterday Magento released another security patch to address this issue. Magento suggests that although there are no confirmed reports of attacks related to these issues to-date, but it is important that you immediately deploy the patch in order to protect your store.
This patch addresses the following security issues:
- It prevents attackers from posing as an administrator to gain access to the last orders feed, which contains personally identifiable information that can then be used to obtain more sensitive information in follow-on attacks. Check to see if you have been compromised by reviewing your server logs for someone trying to reach the /rss/NEW location.
- It closes a number of security gaps including cross-site scripting (XSS), cross-site request forgery (CSRF), and error path disclosure vulnerabilities.
Magento has created patches for both Magento Enterprise and Magento Community Editions. For Magento Enterprise Edition, a patch is available for Enterprise Edition 1.9 and later releases. For Magento Community Edition, a patch is available for Community Edition 1.4.1 to 1.9.1.1 and is part of the core code of their latest release, Community Edition 1.9.2, which is now available for download.
Do you own a Magento store and looking for someone to help you secure your store and apply the patch? Please Get in touch now

by Shoaib Rehman | Jul 1, 2015 | Magento, Web development

To refund an item in an order, you’ll need to create a credit memo. There are two ways to do this, depending on how the invoice was created.
If the order was placed using a payment method that automatically creates invoices (like PayPal or a credit card gateway in authorize and capture mode), or if it was placed using a method that doesn’t accept any actual payment information (like “pay by check”), you’ll need to click the “Credit Memo” button on the main order information screen to create a credit memo.
If the order was placed using a credit card gateway in authorize only mode, and you created the invoice(s) for the order manually, you’ll need to first click on the invoice that contains the payment you want to refund (under Invoices), and click on the “Credit Memo” button from within the invoice.
In simple words, Refunds are processed offline when the customer paid for the goods using cash on delivery, cheque or any other manual method whereas, online refunds are when the customer paid using their Credit/Debit card via Authorize.net or any other online payment gateway.
To refund the customer, please create an online refund using the following procedure:
- Go to the order details page and click on Invoices from the left side menu. Do not click on Credit Memo whilst the information tab is selected.
- On the invoices tab, click on the invoice # and you will see the invoice landing page
- On this page, now click on Credit Memo to create an online refund
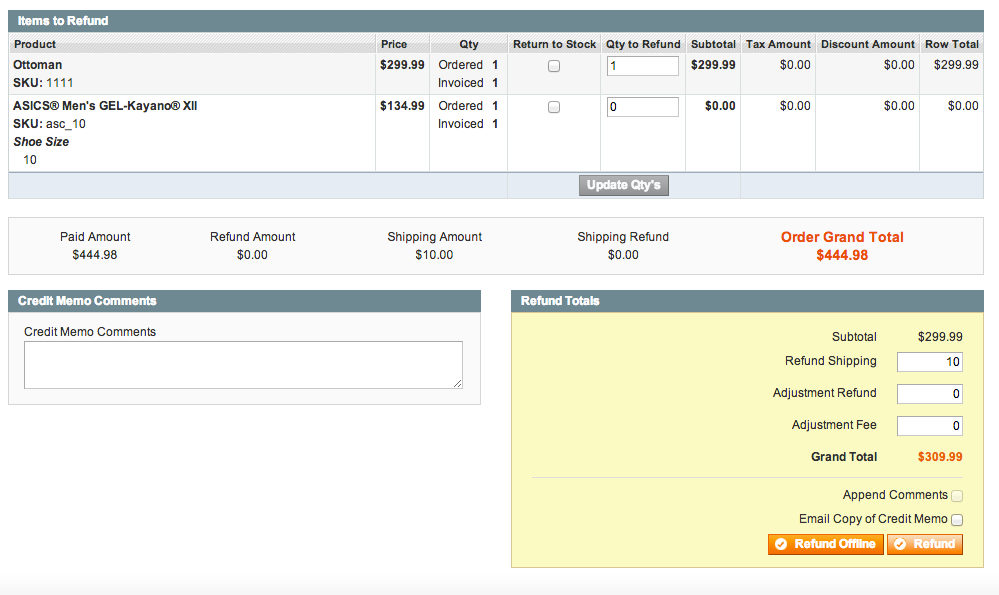
- Fill in the details and the quantity to refund
- Once you are happy with the refund, you will see two buttons at the bottom of the page i.e. Refund offline & Refund. Since it is an online refund so CLICK ON REFUND button. Do not click Refund offline otherwise you will be taken to the offline page again.
Once you have made an online refund now, the transaction will appear in Authorize.net/your payment gateway and the money will be refunded to the customer.
Are you running Magento community edition and would like to refund the money as store credit? Since Magento community edition does not have a default store credit option so check this Store credit extension from MageWorx and get everything up to date.
Looking to buy reliable Magento extensions? Try Xtento Magento extensions.

by Shoaib Rehman | Jun 23, 2015 | Social Media, Web development
Add this one to the annals of “What took you so long Google?” Gmail’s greatest feature just graduated from the service’s experimental labs to become a regular part of Gmail: Undo Send. With this feature enabled, you have a pre-determined number of seconds to recall the email you just sent.
If you’ve never used this feature, I can’t stress enough how helpful it is. We’ve all sent emails we didn’t mean to or had second thoughts about the wording. Prior to Undo Send, we just had to suck it up and live with our mistakes. Not a great situation to be in when email is such a critical communication tool—even in this era of HipChat and Slack.
Overnight success, six years ago
Undo Send began as an experimental feature in 2009 when it offered only a five second retrieval period. It was a hit almost immediately and has been a mainstay of many Gmail accounts since it was first introduced.

Gmail has introduced the much awaited ‘Undo Send’ sent email feature
Although handy, Undo Send does have limits beyond the recall grace period. Once you click Send on an email, an undo option appears at the top of your inbox or whatever page you’re on in Gmail such as sent mail. Once you leave that page, the Undo Send option immediately disappears regardless of the grace period setting. In other words, when you want to use this option don’t click anything until you’ve hit that Undo link.
Undo Send’s graduation into standard Gmail comes less than a month after Google added the feature to Inbox by Gmail.
The impact on you at home: If you’re already an Undo Send user then your current settings won’t be affected. Everything will work as it should. Anyone who’s new to the feature will find it under Settings > General. Undo Send allows you to recall an email either 5, 10, 20, or 30 seconds after you’ve hit Send. I’d recommend the maximum to be extra cautious, but if you like to live on the wild side, 5 or 10 seconds will work just fine.

by Shoaib Rehman | Jun 16, 2015 | Magento

Learn how to fix Destination file or folder not writeable
Sometimes whilst adding new product images you may exprience this error and some times it is not clear as to why this error has occurred. To fix this issue, do the following steps in order and it will resolve it:
- Go to your magento installation directory and open /lib/varien/file/uploader.php
- Search for function ‘public function save($destinationFolder, $newFileName = null)’ or ‘if (!is_writable($destinationFolder))’
- Copy $destinationFolder variable and append it to ‘throw new Exception(‘Destination folder is not writable or does not exists.’)’ so it becomes ‘throw new Exception(‘Destination folder is not writable or does not exists.’.$destinationFolder);’
- Go back to your magento admin panel and try to upload the images again
- You will see the same error but this time the destination folder path will be shown too
- Copy the path, go to your FTP client or SSH and set the file permissions to 777 (it has to be 777 not 775)
- Once done, upload the file back to the server
- Logout from the Magento admin and login again
- Go to the product and this time the images will be uploaded

by Shoaib Rehman | Apr 16, 2015 | Android
Mobile phones have become an integral part of our daily life and nobody can imagine a single day without having to use it. Google now let’s you find your phone via Google search.
According to a survey, there are more than 1 billion devices running on Android and with this number in mind, the number of devices lost everyday is increasing too. Therefore, considering this issue, Google has taken another step towards helping the mobile owners to find their phones using ‘Find my phone’ service.
To retreive the location of your phone, please do the following:
Open Google and make sure you sign in using the account linked to your Android device.
Type ‘Find my Phone’ in the search results and hit search.
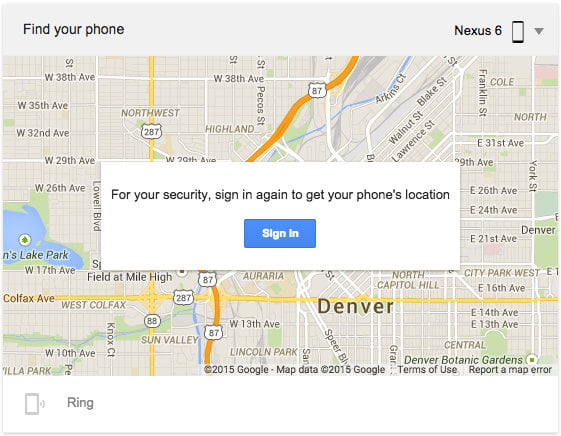
The next step will prompt you to login again for security purposes.

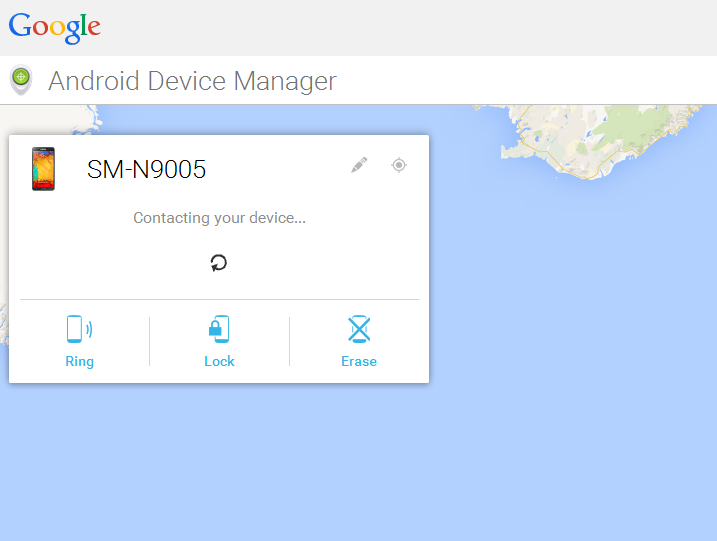
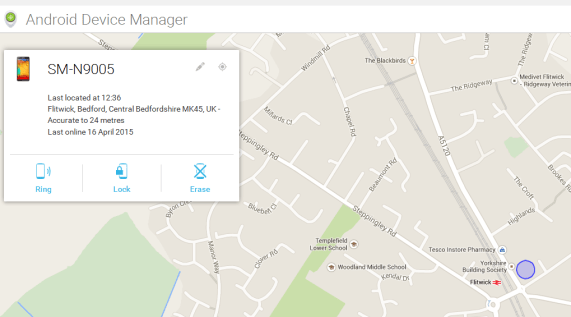
Sign in again and in the next step Google will try to locate your phone

And there you go !!

Once you have located your phone, you can perform the following:
- Ring your phone
- Lock it
- Erase data from it

Taken from Google photos


